For installing RAC
database you will need the below files which can be downloaded from oracle
site.
Oracle Linus 6.4 64 bit OS - V37084-01.iso 3.6G
https://edelivery.oracle.com/EPD/Download/get_form?egroup_aru_number=16064752
https://edelivery.oracle.com/EPD/Download/get_form?egroup_aru_number=16064752
Oracle Database (includes Oracle Database and
Oracle RAC)
linuxamd64_12c_database_1of2.zip 1.3G (1,361,028,723
bytes) (cksum - 3389130601)
linuxamd64_12c_database_2of2.zip 1.1G (1,116,527,103
bytes) (cksum - 273248753)
Oracle Grid Infrastructure (includes Oracle ASM,
Oracle Clusterware):
linuxamd64_12c_grid_1of2.zip 1.7G (1,750,478,910 bytes) (cksum - 3177055641)
linuxamd64_12c_grid_2of2.zip 196M (201,673,595 bytes) (cksum - 2753782116)
Virtual Box Version – 4.2.18 (or the latest version available currently – 4.3.2)
linuxamd64_12c_grid_2of2.zip 196M (201,673,595 bytes) (cksum - 2753782116)
Virtual Box Version – 4.2.18 (or the latest version available currently – 4.3.2)
Below is the system
configuraton which I used for this virtual RAC configuration
RAM – 16GB
OS – Windows 8
HDD – 1 TB
Processor – 3rd generation i7 Quad Core Processor
Virtual Machine Setup:
Navigate to Virtual Box File à Preferences à Network and Edit the Host-Only Network with IP subnet as
below and click OK
IP – 192.168.56.0
Subnet mask – 255.255.255.0
Lets start creating the Oracle Linux virtual server machine, and then eventually clone the same to create the other node of RAC set-up.
Launch Virtual box
and click on New and enter the details as below

Have 5G of
memory is allotted to virtual machine

Create a new
virtual drive as below

Select VDI as
below

Select
Dynamically allocated

Browse the
location in windows explorer to save the VDI. Have the drive created for 50G

Below is how
the newly created virtual machine looks like with the details in the right
pane.

Now let’s
define the networking adapters by clicking the Network option for rac1 virtual
machine created as below

For Adapter1
select the options as below, make a note of the MAC address

For Adapter 2
select/mention the details as below

For Adapter
3, select/mention the details as below. Select Wireless or Ethernet drive name
which you are using to access the internet in your laptop while you trying to
configure this RAC set up now.
In my case I
am have my laptop connected to Wireless signal, that’s why I selected Wireless driver
name.

Once all the
3 adapters are configured, the details under Network option look like below

Guest Linux 6.4 OS
Installation:
In the new virtual machine created, select Storage option in the right
pane as below

Select DVD
icon and browse for the V37ob4-01.iso (Oracle Linux 6.3 OS) under Storage &
Controller: IDE option as below

In Systems
tab in the left pane, move CD/DVD-ROM option to top as below and click OK

Under System à Processor increase processor allotted
to 4, to have good performance when two nodes of RAC are started.

Now start the
rac1 virtual machine to install the Oracle Linux OS by clicking Start button as
below

When the
selection is on ‘Install and Upgrade an existing system‘ press Enter

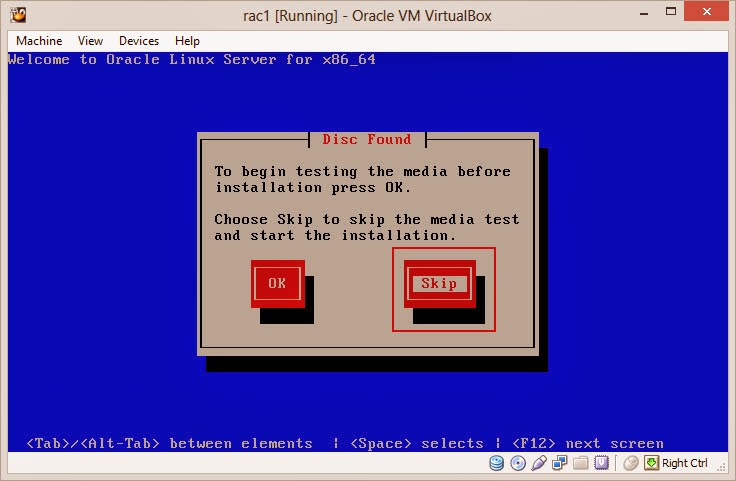
Skip Disc checking

Click Next

Select
English and click Next

Select US
English Keyboard and click Next

Select Basic
Storage Devices and click Next

Select ‘Yes,
Discard any data’ option

Mention
Hostname as – rac1.localdomain, and click on configure network

Select System
eth0 network and mention the IP details as
192.168.56.71, 255.255.255.0


Now select
System eth1 network and mention the IP details as – 192.168.10.1, 255.255.255.0


Finally
select System eth2 network and select the options as below, this network is
used for accessing the internet in the guest linux virtual machine


Now click
Next

Select your
Time Zone and click Next

Set the root
password and click Next

Select Use
All Space and Review & Modify partition layout and then click Next

Check that
the swap memory is around 5G and rest of the space is mounted to /

Format /dev/sda
and write changes to the disk


Have defaults
and click next in the below screen

Select database
server and customize each component as mentioned in below screenshots which
will be useful to configure the RAC setup once the Linux OS is installed


Installation
begins as below


After Installation
is complete. Reboot the Virtual machine and follow the screens mentioned post
reboot


Check Internet
Access by pinging any .com site like – yahoo.com as below. If the response
comes back we are good. Else disconnect from eth0 & eth1 networks keeping
eth2 (Bridged Adapter) is connected and try to ping yahoo.com to test the
internet connectivity

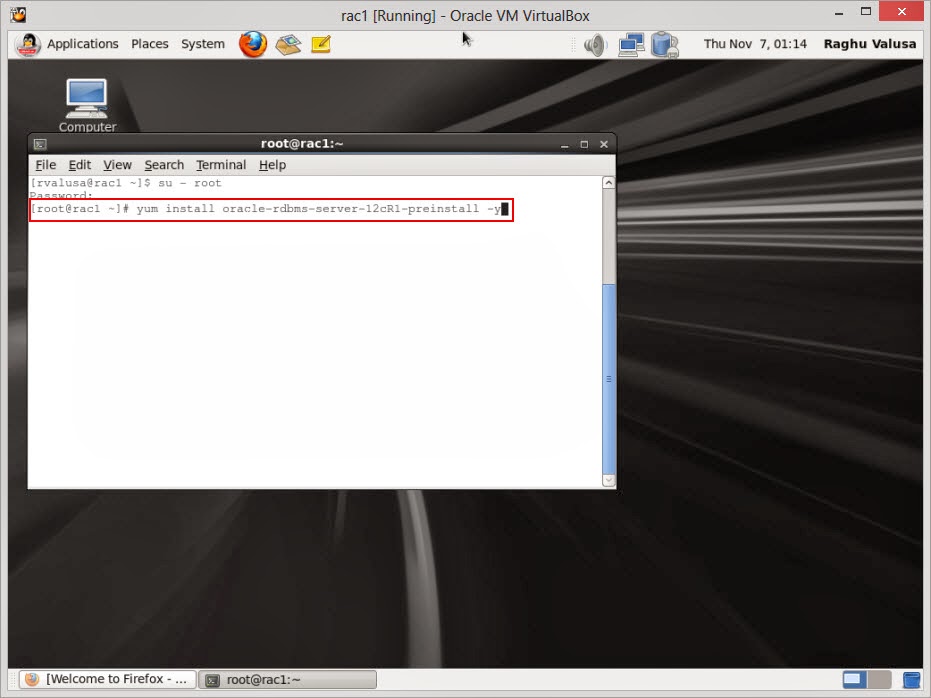
Oracle 12c
Pre-Install package installation:
Run yum install
oracle-rdbms-server-12cR1-preinstall –y to perform Oracle database 12c kernel
parameter change and creation of Linux oracle account.


Once the pre-install package is installed, do a complete yum update using - $ yum update command (screenshots for this are not captured in here)
Installation
of Guest Additions:
Reboot the
Virtual machine and click Devices à Install Guest Additions. In the Guest
Additions install pop-up displayed, select Open Autorun prompt and then install
it by mentioning the root password.


If for some
reason building of guest addition module failed, install the missing package
and then try again the installation of Guess Addition as shown above.


Reboot the virtual machine and then login as root using su and Install ASMLib from yum as below

Install oracleasm-support in root login itself
It is noticed that as part of yum update oracleasm package has already been installed# yum install oracleasm # yum install oracleasm-support
Install oracleasm-support in root login itself

Configure ASM
in an interactive (-i) way as below.
Answers to the interactive questions posted are in the order - oracle, oinstall, y & default y (just press enter key)

Create the directory in which the Oracle software will be installed. And map oracle user to group oinstall and give ownership to /u01 and 775 permissions.
mkdir -p /u01
chown -R oracle:oinstall /u01
chmod -R 775 /u01/
[rvalusa@rac1~]$ su - root
Password:
[root@rac1~]# mkdir -p /u01
[root@rac1~]# chown -R oracle:oinstall /u01
[root@rac1~]# chmod -R 775 /u01/
[root@rac1~]#
Add oracle account to dba and vboxsf groups. The vboxsf group was created by VirtualBox Guest Additions and will allow oracle user access folders in the Host OS:
# usermod -G dba,vboxsf oracle
[root@rac1~]# usermod -G dba,vboxsf oracle
Reset oracle user password:
[root@rac1~]# passwd oracle
Changing password for user oracle.
New password:
Retype new password:
passwd: all authentication tokens updated successfully.
[root@rac1~]#
Disable secure linux by editing the "/etc/selinux/config" file, making sure the SELINUX flag is set as follow
SELINUX=disabled

Either configure NTP, or make sure it is not configured so the Oracle Cluster Time Synchronization Service (ctssd) can synchronize the times of the RAC nodes. In this case we will deconfigure NTP.
# service ntpd stop
Shutting down ntpd: [FAILED]
# chkconfig ntpd off
# mv /etc/ntp.conf /etc/ntp.conf.orig
# rm /var/run/ntpd.pid
# service ntpd stop
Shutting down ntpd: [FAILED]
# chkconfig ntpd off
# mv /etc/ntp.conf /etc/ntp.conf.orig
# rm /var/run/ntpd.pid

Cleanup YUM repositories:
# yum clean all
[root@rac1 ~]# yum clean all
Loaded plugins: refresh-packagekit, security
Cleaning repos: public_ol6_UEK_latest public_ol6_latest
Cleaning up Everything
Edit "/etc/hosts" file by appending the following information:
# Private
192.168.10.1 rac1-priv.localdomain rac1-priv
192.168.10.2 rac2-priv.localdomain rac2-priv
# Public
192.168.56.71 rac1.localdomain rac1
192.168.56.72 rac2.localdomain rac2
# Virtual
192.168.56.81 rac1-vip.localdomain rac1-vip
192.168.56.82 rac2-vip.localdomain rac2-vip
# SCAN
192.168.56.91 rac-scan.localdomain rac-scan
192.168.56.92 rac-scan.localdomain rac-scan
192.168.56.93 rac-scan.localdomain rac-scan

Note. The SCAN address should not really be defined
in the hosts file. Instead it should be defined on the DNS to round-robin
between 3 addresses on the same subnet as the public IPs. For this
installation, we will compromise and use the hosts file. If you are using DNS,
then comment out lines with SCAN addresses.
Now we need to disable the firewall: Linux Main menu | System | Administration | Firewall. Click on "Disable" icon, then on "Apply".


Creating
Sharing Folders in VirtualBox:
To install the grid infrastructure and database, we need to access the required installables - grid & database which are present in the folder in Host OS windows 8.
Unzip both grid and database files to a folder named - OracleInstallables and keep the files related to grid 12c in grid folder & database 12c files in database folder
Content of the below zip will be kept in folder named grid (Copy files in install & stage folder in linuxamd64_12c_grid_2of2.zip to respective folder found on unzipping linuxamd64_12c_grid_1of2.zip )
linuxamd64_12c_grid_1of2.zip
linuxamd64_12c_grid_2of2.zip
Content of the below zip will be kept in folder named database (Copy files in install & stage folder in linuxamd64_12c_database_2of2.zip to respective folder found on unzipping linuxamd64_12c_database_1of2.zip )
linuxamd64_12c_database_1of2.zip
linuxamd64_12c_database_2of2.zip
Browse for the folder - OracleInstallables and then Auto-Mount and make it permanent.
The shared folder will be listed in Guest OS -Linux at /media/sf_OracleInstallables.


Now reboot the VM and install the grid pre-install rpm as root login as below

Clone
the Virtual Machine:
Shutdown the running rac1 VM to clone it to create a similar VM which can be used as other node of RAC configuration. Below are the screenshots which depict the details on cloning the VM
select rac1 VM --> Machine --> Clone.. option, mention the name of new VM as rac2 (don't select Reinitialize the MAC address of all network cards)

Select Full clone and let the clone get created.. It may take few mins to get the clone creation complete.


HOSTNAME=rac2.localdomain
Start "Network Connections" tool (Main menu | System | Preferences | Network Connections). Edit eth0 and eth1 interfaces and set in IPv4 addresses 192.168.56.72 and 192.168.10.2 correspondingly and then Reboot


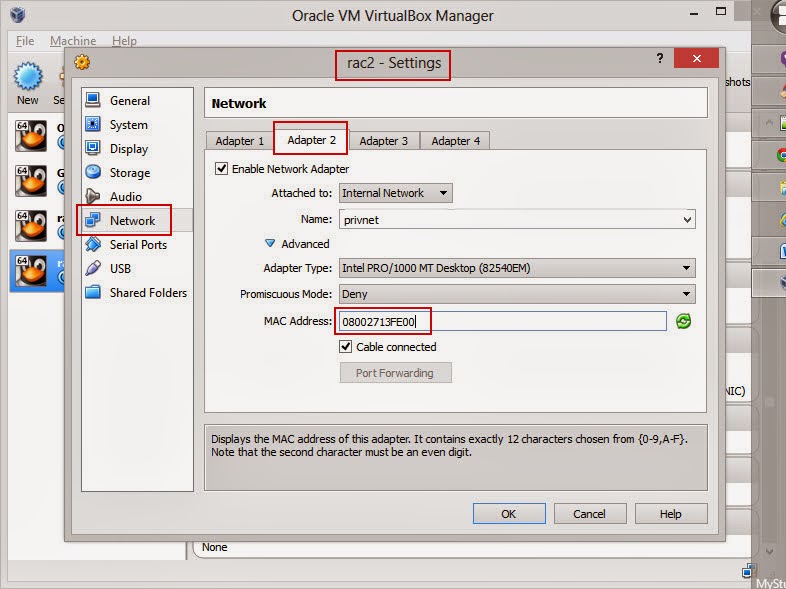
Now we need to change MAC address for all three interfaces. At the moment we have two VMs with the same set of MAC addresses. We can run one machine or another, but not both of them at the same time because MAC address must be unique. No changes will be made to rac1, we will pick up three new unused addresses and set them for eth0, eth1, and eth2 in rac2.
The easiest way to do that is to change just last two characters of the address. We are going to change them to '00'. If the last two characters are already '00', then change to something else, '01', for example. Just make sure that these addresses don't collide with the MAC addresses of rac1. In running rac2 node, open "Network Connections" and edit MAC address in the "Wired" tab. The screenshot below shows where to set MAC address.
Don't forget to change MAC addresses for all three interfaces. Please note that your setup will have a different set of MAC addresses because they are random-generated by VirtualBox.


Rac2
eth0 - 192.168.56.72 - MAC - 08:00:27:BF:D4:00 – Adapter 1
eth1 - 192.168.10.2 - MAC - 08:00:27:13:FE:00 – Adapter 2
eth2 - Automatic - MAC - 08:00:27:28:2B:00 – Adapter 3


Start both rac1 & rac2 VMs and check the connectivity to both VMs from each other by pinging each.


Creating Shared Disk: Shut down both virtual machines. We need to create a new virtual disk, change its attribute to Shareable and add to both VMs. In the current version of VirtualBox, the only way to create a new disk in the GUI is through the "Storage" page in the virtual machine's settings. Select either rac1 or rac2 VM, then click on "Storage" link. Select "SATA Controller" and click on "Add Hard Disk" icon. If not sure, which icon to use, same action is available through the popup menu, right-click on the "SATA Controller" and select "Add Hard Disk"

save the .vdi file to local drive in your PC as below and mention the size of the shared drive to 12G (or > 12G)


Note that the .vdi shared disk added will be in normal type (not shared type). We need to change that to shared type so that it is accessible to both RAC nodes

Remove the existing shared disk using remove virtual disk button and then click on the Add Virtual Disk button to add the same virtual disk in Shared mode or type.


Start either of the machines and log in as root. The current disks can be seen by issuing the following commands.
# ls /dev/sd*
/dev/sda /dev/sda1 /dev/sda2 /dev/sdb
#
Use the "fdisk" command to partition the new disk "sdb".
# fdisk /dev/sdb
Device contains neither a valid DOS partition table, nor Sun, SGI or OSF disklabel
Building a new DOS disklabel with disk identifier 0xd724aa83.
Changes will remain in memory only, until you decide to write them.
After that, of course, the previous content won't be recoverable.
Warning: invalid flag 0x0000 of partition table 4 will be corrected by w(rite)
WARNING: DOS-compatible mode is deprecated. It's strongly recommended to
switch off the mode (command 'c') and change display units to
sectors (command 'u').
Command (m for help): n
Command action
e extended
p primary partition (1-4)
p
Partition number (1-4): 1
First cylinder (1-305, default 1):
Using default value 1
Last cylinder, +cylinders or +size{K,M,G} (1-305, default 305):
Using default value 305
Command (m for help): w
The partition table has been altered!
Calling ioctl() to re-read partition table.
Syncing disks.
#
The sequence of answers is "n", "p", "1", "Return", "Return" and "w".
Once the new disk is partitioned, the result can be seen by repeating the previous "ls" command.
# ls /dev/sd*
/dev/sda /dev/sda1 /dev/sda2 /dev/sdb /dev/sdb1
#
Mark the new shared disk in the ASMLib as follows.
# oracleasm createdisk DISK1 /dev/sdb1
Writing disk header: done
Instantiating disk: done
#
Run the "scandisks" command to refresh the ASMLib disk configuration.
# oracleasm scandisks
Reloading disk partitions: done
Cleaning any stale ASM disks...
Scanning system for ASM disks...
#
We can see the disk is now visible to ASM using the "listdisks" command.
# oracleasm listdisks
DISK1
#
Start another VM and log in as root. Check that the shared disk is visible to ASM using the "listdisks" command.
# oracleasm listdisks
DISK1
#
The virtual machines and shared disks are now configured for the grid infrastructure!

Installing Grid Infrastructure:
Make sure the "rac1" and "rac2" virtual machines are started, then login to "rac1" or switch the user to oracle and start the Oracle installer.
The below screenshots are self explanatory on what options need to be selected while installing the Grid Infrastructure (GI). Please note that the it is required to install the GI in one of the RAC node and then automatically that same will be installed in the other RAC node.


Work In-Progress.. Thanks for visiting the page. Will update this for closure shortly
Very nice, and very well detailled job !!!
ReplyDeleteThanks a lot for your sharing
Mc
Np.. Will keep posting nice stuff on oracle.. Now I am back from my vacation
ReplyDeleteNice blog post Raghu. Waiting for this blog to complete.
ReplyDeleteRaghu, this is cool.. Appreciate your efforts.
ReplyDelete